

Check out my new YouTube video on how I made a Cornhole Game from Old Pallets and Beer Labels. If you would like instructions on how to make one yourself see below…
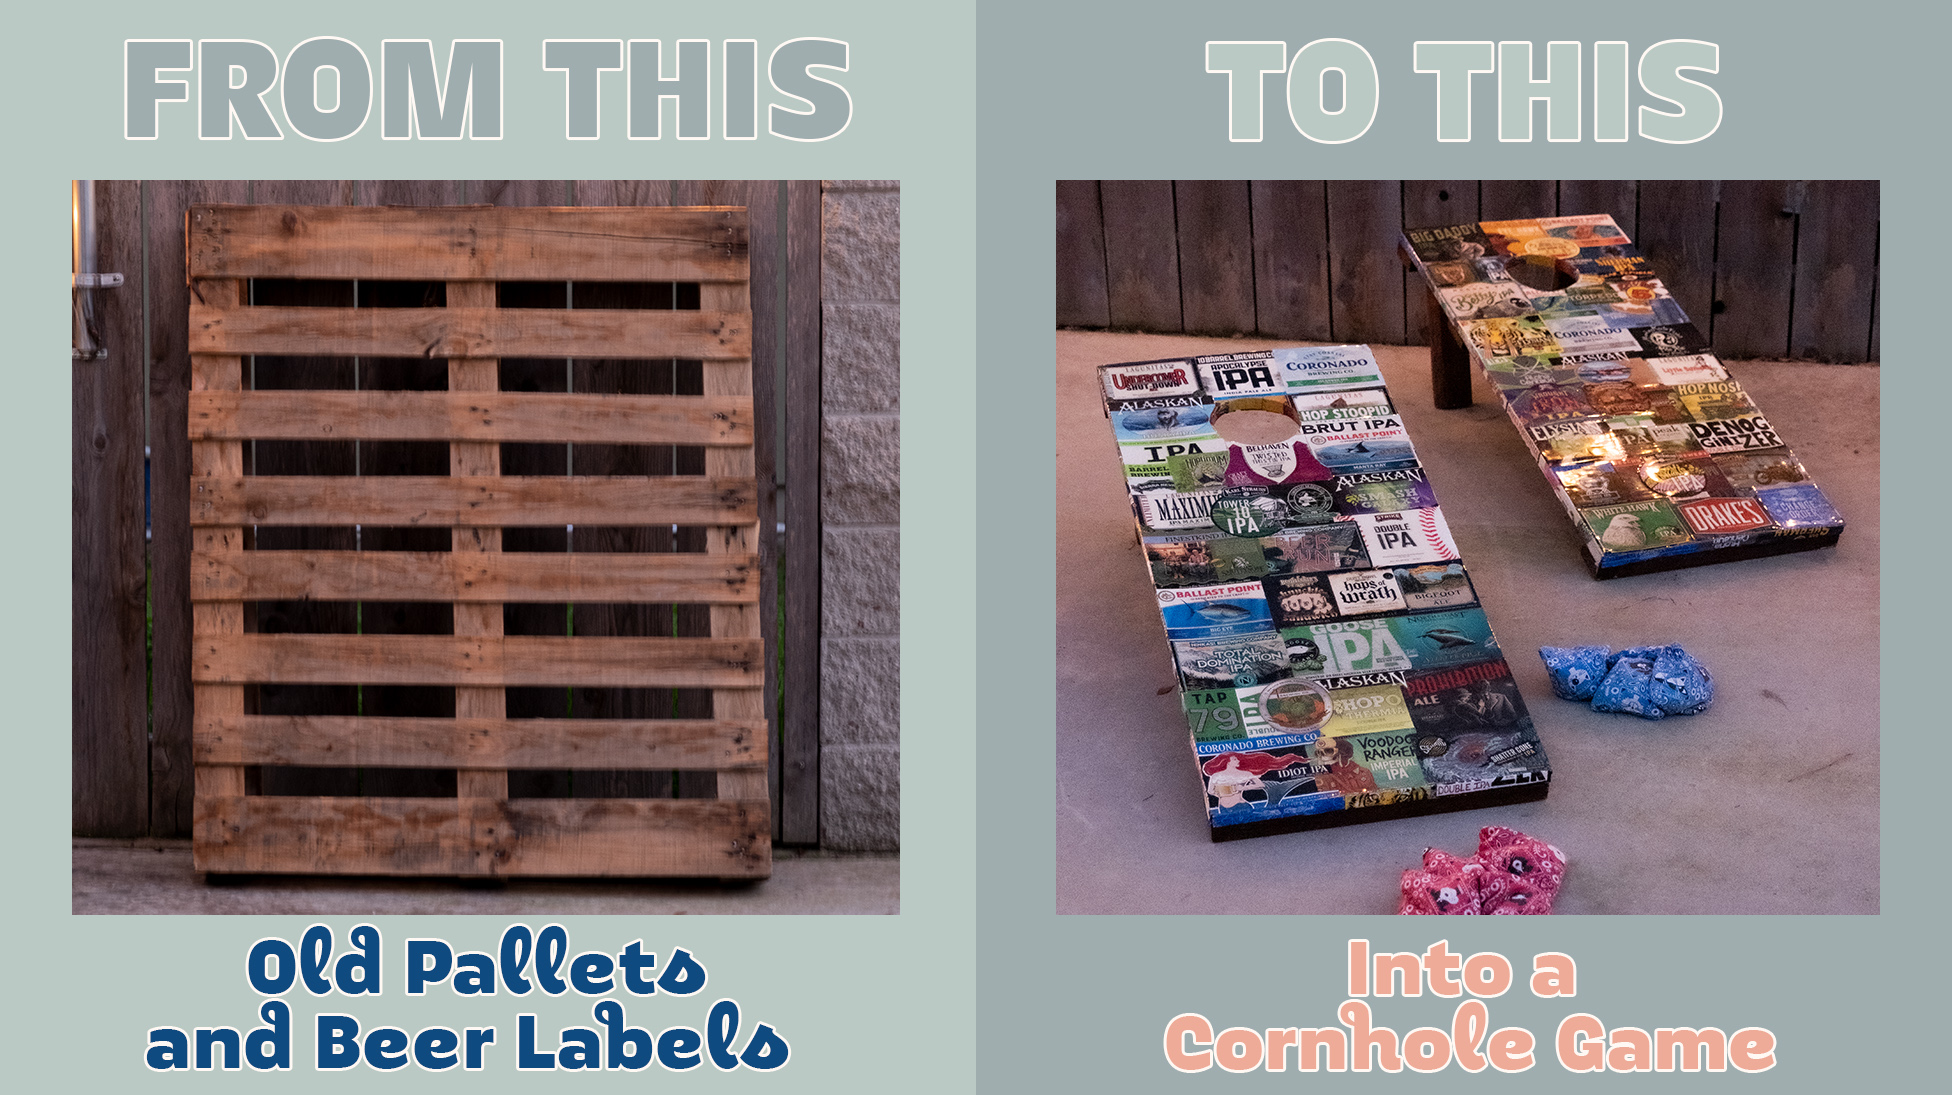
Cornhole Game from Old Pallets and Beer Labels
Directions to make Two Cornhole Boards
SAFETY GEAR:
-Work gloves
-Goggles
-Earplugs
-Dust mask
STEP 1: TAKE APART PALLET WITH CROWBAR
-2 Pallets
-Crowbar
This took me over 2 hours, there has got to be a better way!
STEP 2: MEASURE PLANKS TO CREATE PATTERN
-Measuring tape
-Paper
-Pencil
I divided the planks into two sets to see how long and wide I could make my two Cornhole boards. The dimensions for the board I made are 48″ in height by 24″ for width. The legs will be 12″ in length. The 3 cross sections to be screwed to back are 24″ each.
STEP 3: CUT AND SAND CROSS SECTIONS
-Measuring tape
-Pencil
-Saw
-Belt Sander
-Clamps
Measure twice, cut once. Each Cornhole board has three 24″ cross sections.
STEP 4: SCREW DOWN CROSS SECTIONS
-Drill
-Screws 1.5”
-Clamps
-Bar Soap
I discovered that using a bar of soap to lubricate the screws helps to prevent the wood from splitting. I learned that you must make 3 cross sections in order to prevent the boards from getting loose when you drill out your hole. One at the top, bottom and middle. Make sure the middle cross board does not intersect to where you will drill out your hole.
STEP 5: CUT AND SAND LEGS
-Measuring tape
-Pencil
-Saw
-Belt Sander
-Clamps
Each board has two 12″ legs.
STEP 6: CUT OUT CIRCLE WITH JIGSAW
-Jigsaw
-Drill
-1.5” circle cutter drill bit
-Pencil
-Measuring tape
-String
-Thumbtack
-Clamps
I measured the center, 9” from top and 12” from side. Attach a pencil to a string 3”, attached to a thumbtack. Push the thumbtack to the center of your measurement and draw a circle. Use your 1.5” circle cutter bit on your drill to make a pilot hole. Then use your Jigsaw to cut out the circle you drew on the board, using the pilot hole as your starting point.
STEP 7: SMOOTH INSIDE OF CIRCLE
-Dremel tool
-Dremel sanding bit
STEP 8: SCREW IN HINGES FOR LEGS
-Four 3.5” door hinges
-Screws (come with set of hinges)
-Pencil
-Masking tape
-Drill
-Clamps
-Measuring tape
Each leg has one hinge to attach to board. I used masking tape to mark which side was attached to board and which side attached to legs to prevent confusion. Use a pencil to mark location of hinges before you screw them in, that way if they wiggle you can correct.
STEP 9: COLOR STAIN WOOD
-2” Paint Brush
-Wood stain
-Stirring Stick
-Flathead screwdriver
-Rags
I only used stain on the legs and bottom side of boards.
STEP 10: CUT CARDBOARD TO FIT TOP
-Box cutter knife
-Large cardboard box
-Yard Stick Ruler
-Pencil
Use the Cornhole boards to measure the cardboard. Make sure to cut out the hole in the middle.
STEP 11: GLUE BEER LABELS TO CARDBOARD
-Beer Labels (70 aprox.)
-Books (big & heavy)
-Mod Podge (glue)
-1” Paint Brush
-Rags
-Water bowl
Cut strips out of extra beer labels to cover sides of board. Fold strips in half (longways) to cover the side. Glue the sides and circle sides down first. Use heavy books to weigh down while drying to prevent warping and lifting. Once sides are dry, then map out the label collage to cover entire surface of Cornhole board. Once you have your design mapped out, then glue them down. Using heavy books to prevent warping and lifting. Use the paint brush to cover entire bottom surface of label to glue down.
STEP 12: GLUE TOP LAYER TO SEAL LABELS
-Mod Podge (glue)
-1” Paint Brush
Once all labels are glued down and dry. Add a layer of glue over entire top surface. Wait for that to dry, then do another layer.
STEP 13: GLUE AND CLAMP COLLAGE TO WOOD
-8 Bungee Cords
-8 Clamps
-Dropcloth
-5/8” small nails
-Hammer
-Woodglue
Cover the top and sides of your wood Cornhole game with wood glue. Then match up your cardboard beer label collage to the wood game. Use the clamps and bungee cords to flatten the cardboard to the wood. Using the small nails, nail around the sides and top perimeter of board. Leave clamps and bungee cords on over night till dry.
STEP 14: EPOXY RESIN TOP COAT ON COLLAGE
-Disposable clear cups
-Disposable gloves
-Dropcloth
-Epoxy resin
-Isopropyl Alcohol
-Spray bottle (for Isopropyl Alcohol)
-Stirring stick
Follow directions on the label of your epoxy resin. I used the Alcohol in a spray bottle to break any air bubbles that appeared on the surface after pouring.
STEP 15: SEW 8 SQUARE BEAN BAGS
-Sewing Machine
-Sizers
-Yard Stick Ruler
-Thread (color of material)
-1 Yard Material (color A)
-1 Yard Material (color B)
Make a total of 8 bean bags, 4 of each color. Cut material to size 7″ x 7″ and sew two sides together, leaving a small opening for the beans to be poured in.
STEP 16: FILL BAGS WITH BEANS
– 8 Lbs of beans
– Water bottle (bottom cut off for funnel)
I cut the bottom off of an empty water bottle to use as a funnel. Each bag is filled with 1 pound of beans. Once filled up sew the hole closed.
